
Creating an Android App User Interface - Registration Screen
Estimated time: 30 minutes
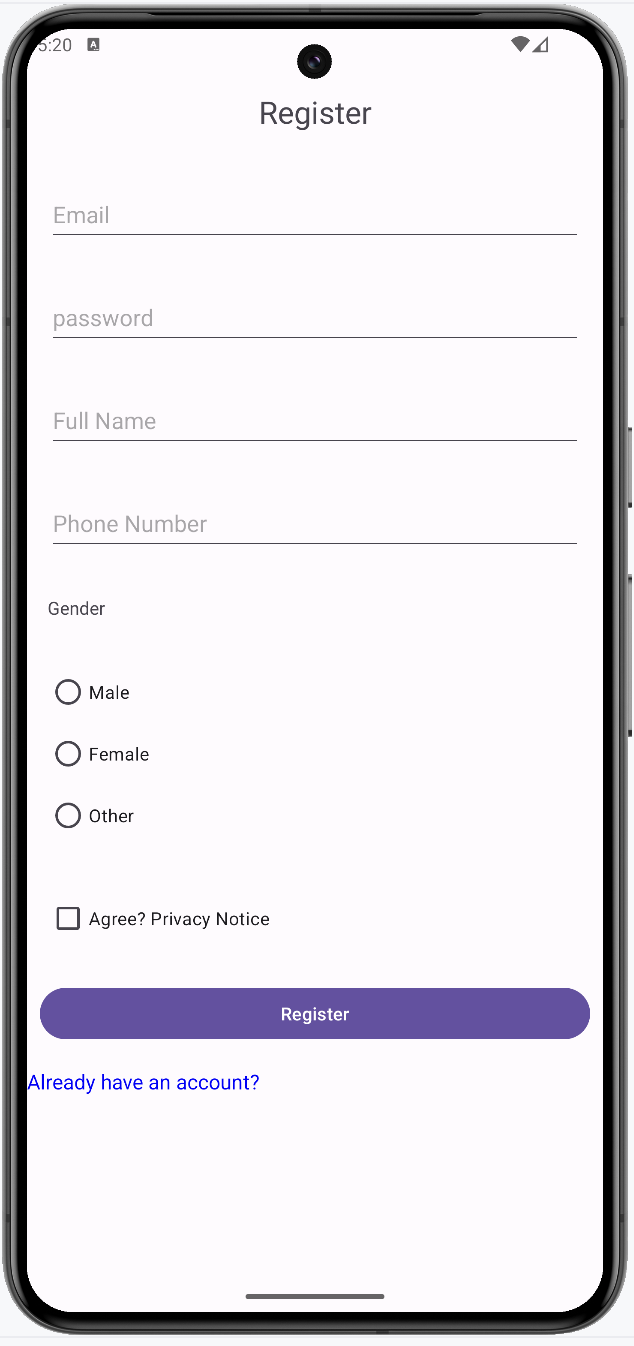
Welcome to the lab on building a registration screen user interface in Android Studio. You will use the linear layout along with multiple widgets to build the view. The final result would look something like this:
Objectives
After completing this lab, you will be able to:
- Create a registration screen UI using LinearLayout inside a ScrollView
- Understand the usage of RadioGroup, RadioButton, and CheckBox
- Learn how to use children layouts
Running the lab
This is an instructional lab that does not require a Skills Network lab environment. You will follow this lab on your local machine using Android Studio.
New widgets introduced
Creating a registration screen involves a careful balance of usability and data collection. Users should find the form easy to complete without feeling overwhelmed by too many fields. Registration forms should be straightforward and clear.
Key elements of a good UX include: - Logical grouping of fields - Clear labeling - Appropriate input types to enhance user experience and data integrity
The lab introduces a few new widgets:
- ViewGroup: An invisible container that defines the layout structure for View and other ViewGroup objects.
- ScrollView: A view group that we can use to create vertically scrollable views.
- RadioGroup: A container that holds multiple RadioButton widgets, allowing the user to select only one option at a time.
- RadioButton: A widget that allows users to select one option from a set.
- CheckBox: A widget that allows users to select or deselect an option.
Instructions
Step 1: Open the previous project
You can skip this step if you already have the project from the previous lab open in Android Studio.
- Open Android Studio.
- Open the project you created in the previous lab.
Step 2: Create a new Java activity and XML view file for registration
In the project tool window, navigate to
app > src > main > com > example > loginapplicationdirectory.Right-click on the directory, select
New > Activity -> Empty Views Activity.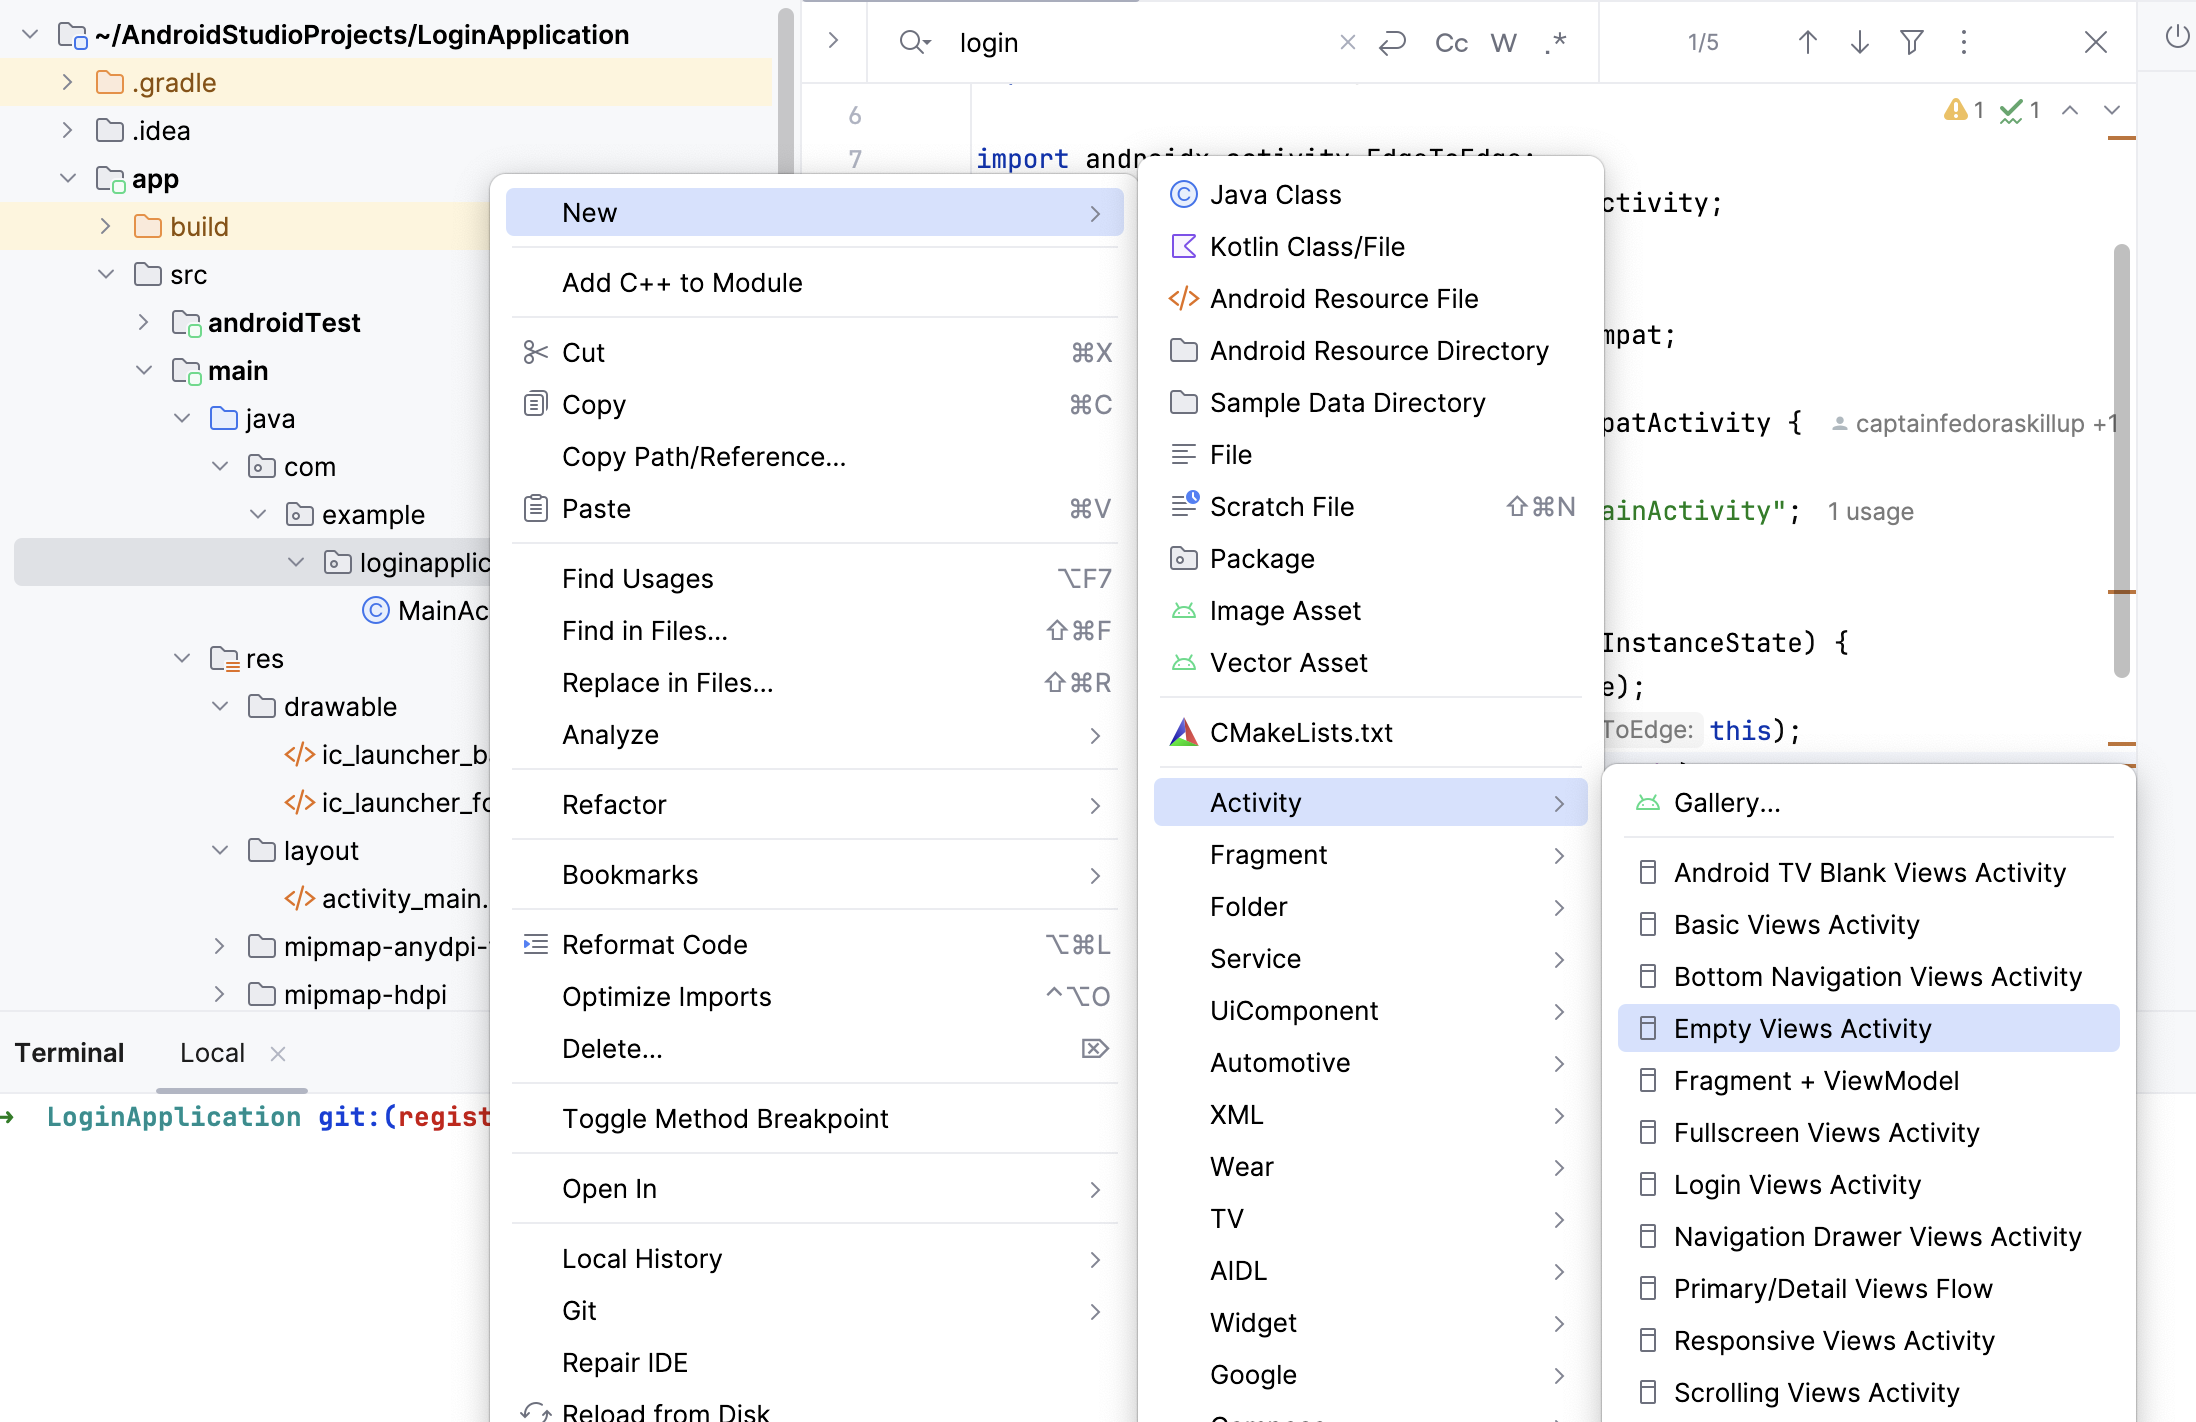
Name the activiy
RegisterViewActivityand the corresponding viewregister_view.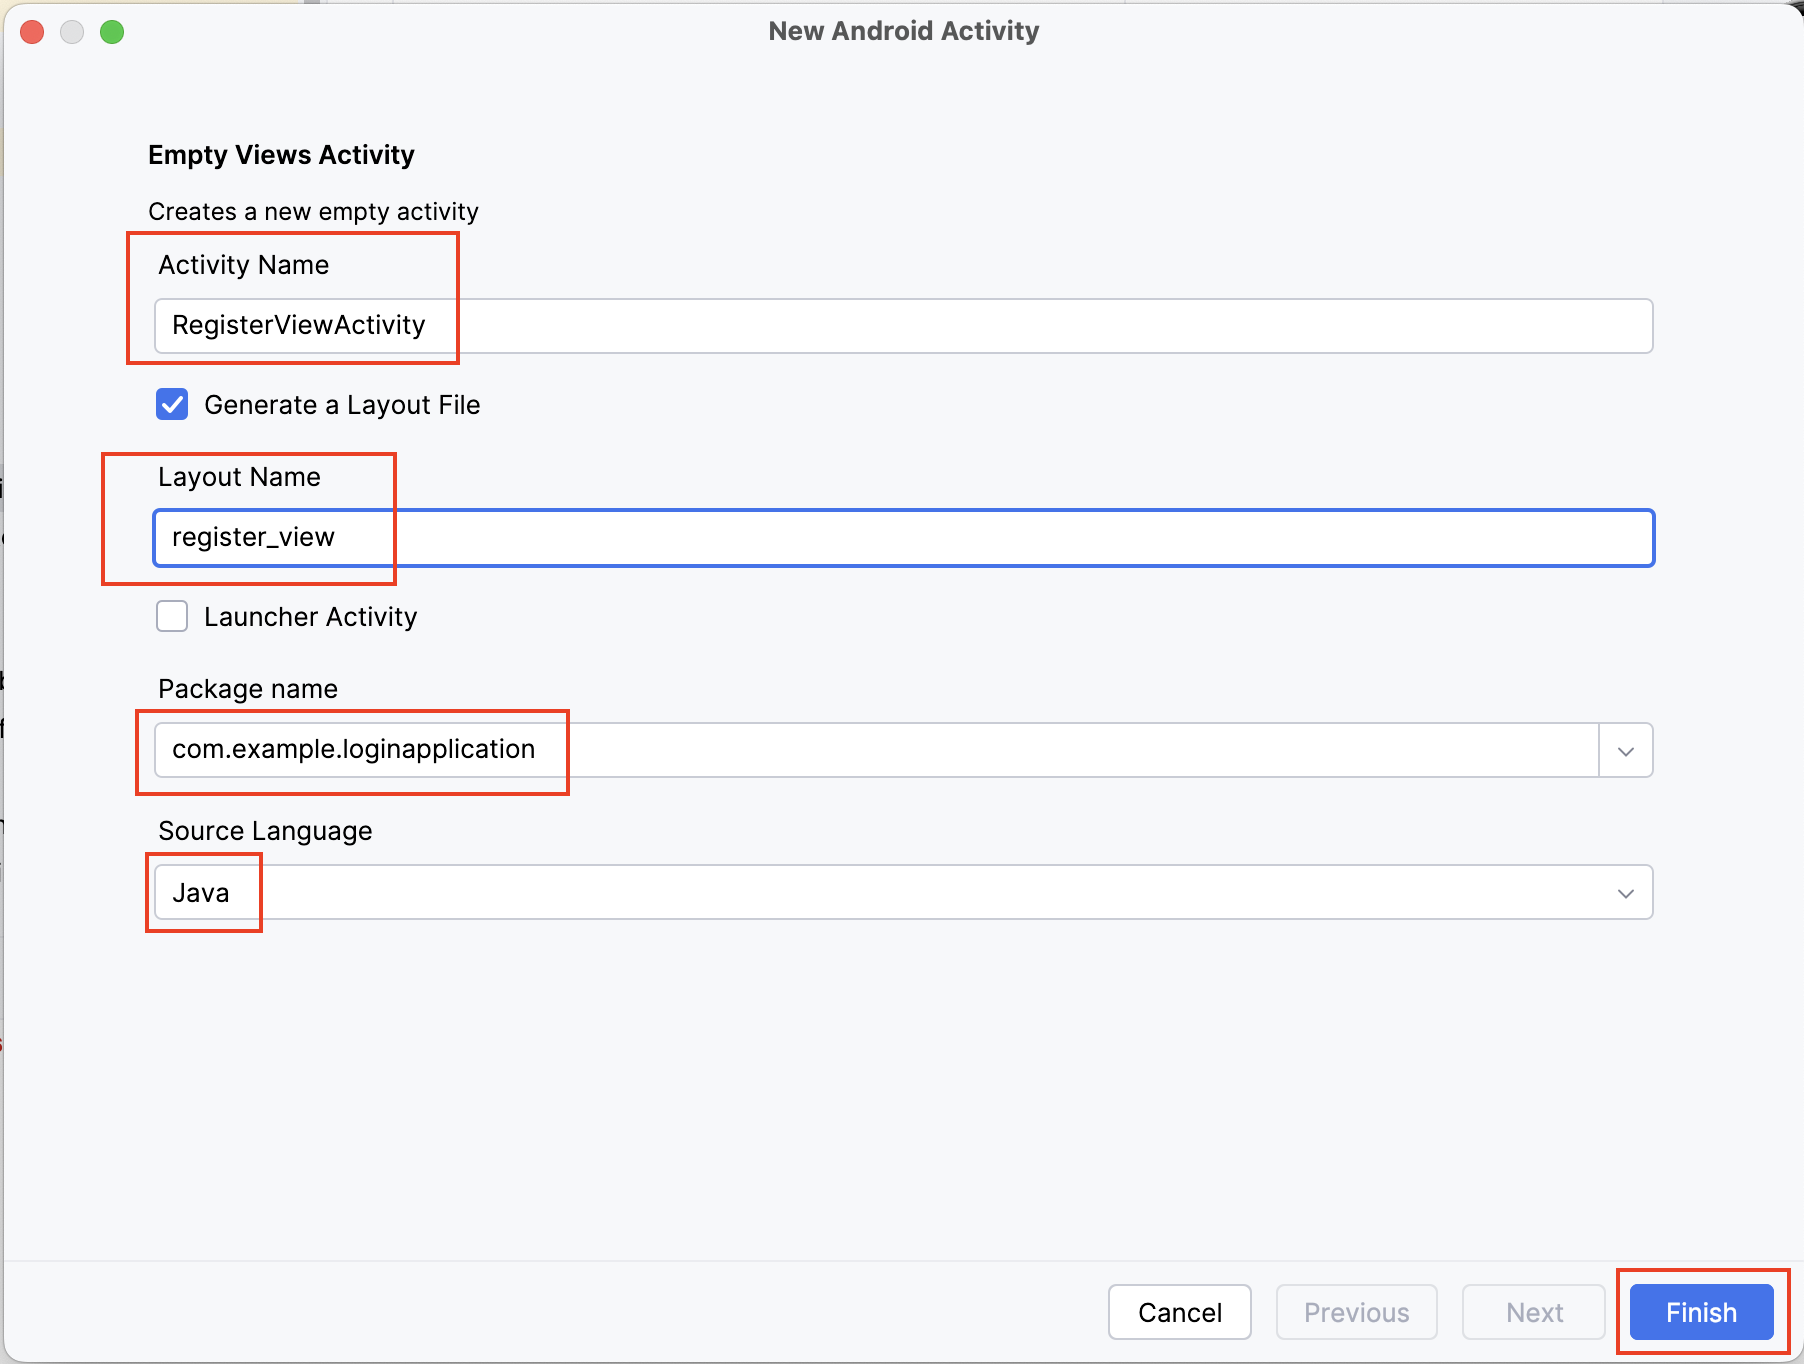
This should creatre a Java files named
RegisterViewActivity.javaand a corresponding view namedregister_view.xml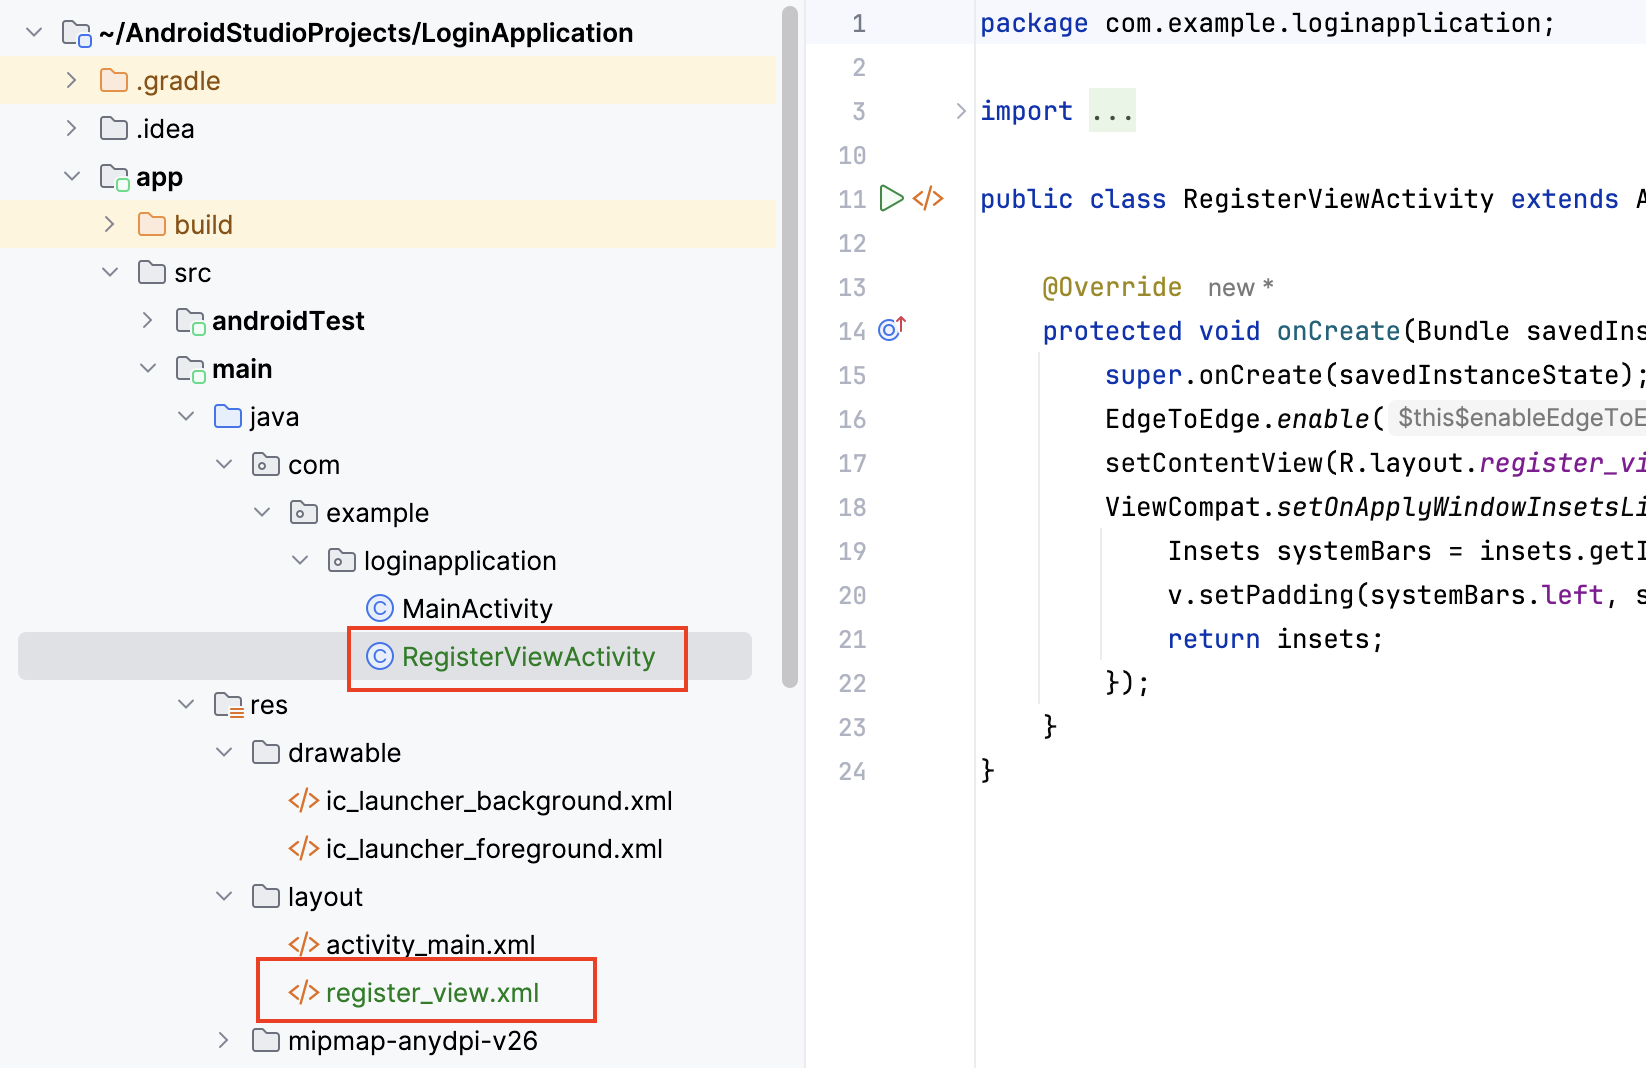
Open the
register_view.xmlfile indesign view.Right click the
mainlayout in the component tree and selectConvert view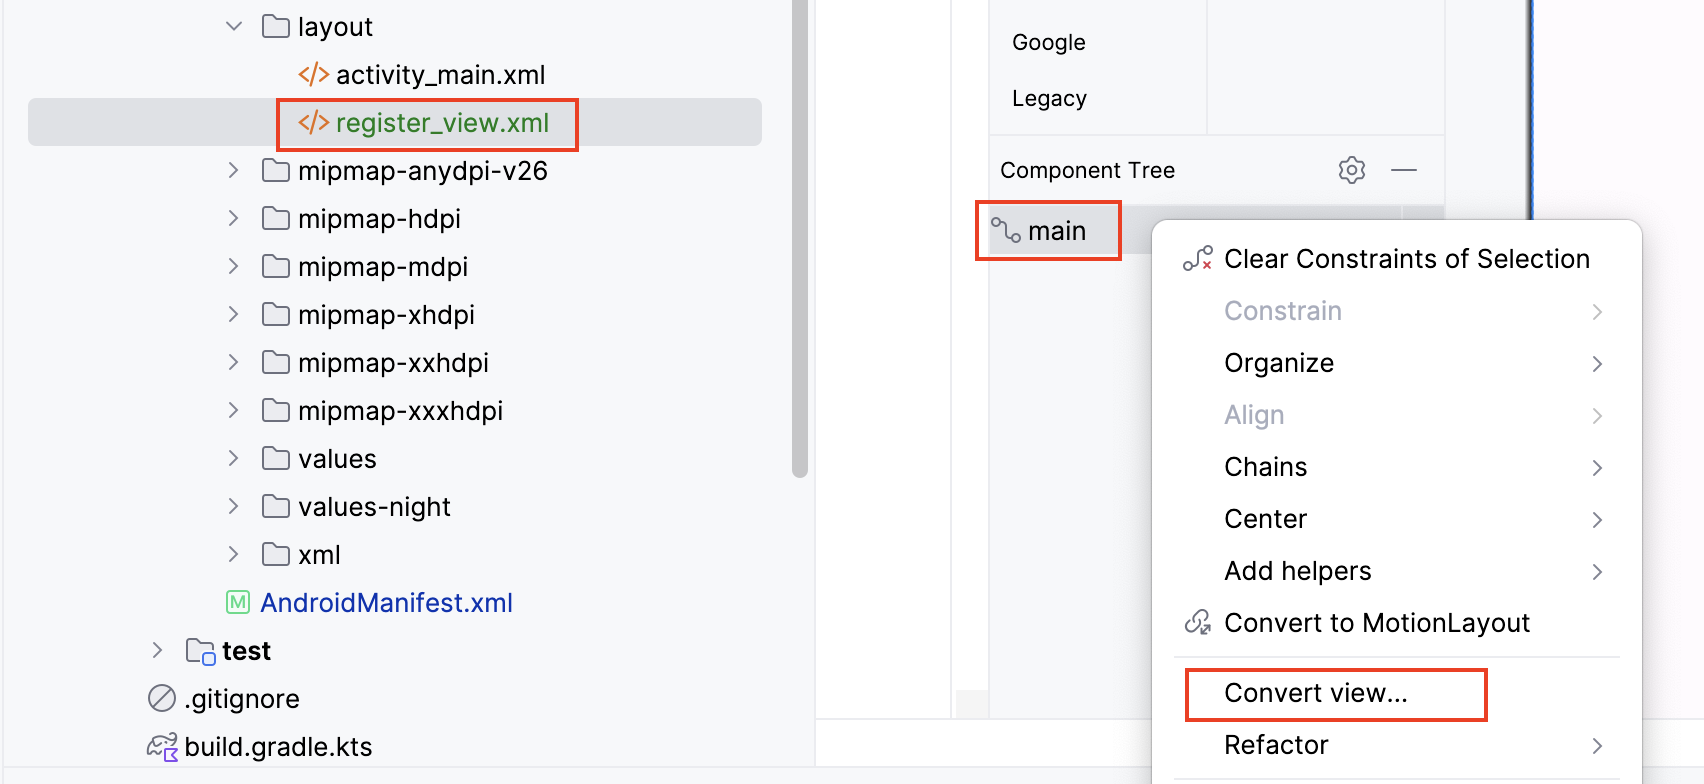
You want to convert to
ScrollView. This option is not available and you will have type it out.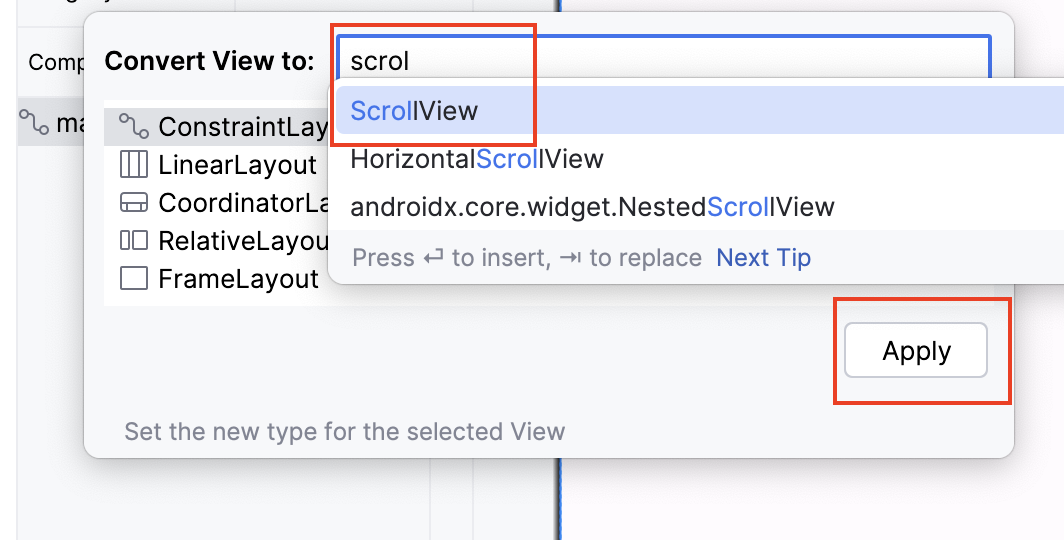
You might notice a red flag and an issue "Speakable text not present." This will do away once you add a
LinearLayoutto the canvas. Drop aLinearLayoutfrom the widget library to the canvas.
Since you have already worked with the drag-and-drop interface in the design view, the lab does not provide any further screenshots. You will however be given all the properties that need to be set for each field.
Step 3: Add LinearLayout
Drag a
LinearLayout (vertical)from the Palette to theScrollView.Check the
orientationis set tovertical.
Step 4: Add title as TextView
Drag a
TextViewfrom the Palette to theLinearLayout.In the
Attributespanel, set theidtoapp_title.Set the
texttoRegister.Set the
layout_marginto24dp.Set the
textSizeto24sp.Set the
gravitytocenter.Set
paddingto16dp.
At the end of this step, you should have a TextView that
serves as the title text of your registration screen.
Step 5: Add email EditText
Drag an
E-mailfrom the Palette to theLinearLayout, below theTextView. If it is hard to drop it in the linear layout, you can always add it to the component tree.In the
Attributespanel, set theidtoemail.Set
minHeightto48dp.Delete the
textattribute if present and set thehinttoEmail (Username).Confirm that the
inputTypeistextEmailAddress.Set
layout_marginto16dp.
Step 6: Add password EditText
Drag an
Passworditem from the Palette to theLinearLayout, below the Email EditText.In the
Attributespanel, set theidtopassword.Delete the
textattribute and set thehinttoPassword.Confirm the
inputTypeis set totextPassword.Set
minHeightto48dp.Set
layout_marginto16dp.
Step 7: Add full name EditText
Drag a
PlainTextfrom the Palette to theLinearLayout, below the Password EditText.In the
Attributespanel, set theidtofull_name.Delete the
Namefrom thetextattribute and set thehinttoFull Name.Confirm that the
inputTypeistext.Set
minHeightto48dp.Set
layout_marginto16dp.
Step 8: Add phone number EditText
Drag a
Phonetext item from the Palette to theLinearLayout, below the Full Name EditText.In the
Attributespanel, set theidtophone_number.Set the
hinttoPhone Number.Confirm that the
inputTypeisphone.Set
minHeightto48dp.Set
layout_marginto16dp.
Step 9: Add gender RadioGroup
Drag a
TextViewfrom the Palette to theLinearLayout, below the Phone Number EditText.In the
Attributespanel, set the text toGender.Set the
layout_marginto16dp.Drag a RadioGroup from the Palette to the
LinearLayout, below the Gender TextView.In the
Attributespanel, set theidtogender_group.Add three RadioButton widgets inside the RadioGroup with ids
male,female, andother.Set the text for each RadioButton to
Male,Female, andOther, respectively.
Step 10: Add Agree CheckBox
Drag a
CheckBoxfrom the Palette to theLinearLayout, below the RadioGroup.In the
Attributespanel, set theidtoagree_checkbox.Set the text to
Agree? Privacy Notice.Set the
layout_marginto16dp.
Step 11: Add the Register Button
Drag a
Buttonfrom the Palette to theLinearLayout, below the CheckBox.In the
Attributespanel, set theidtoregister_button.Set the
texttoRegister.Set
layout_marginto10dp.
Step 12: Add the "Already have an account?" link
Drag a
TextViewfrom the Palette to theLinearLayout, below the Register Button.In the
Attributespanel, set theidtologin_link.Set the
texttoAlready have an account?Set the
textColorto a color resource or a hex value to make it look like a link (e.g.,#0000FFfor blue).Set the
textSizeto16sp.Set
layout_marginTopto8dp.
Step 13: Run the application
The
app/src/main/AndroidManifest.xmlfile tells Android Studio about what activity to run when the app starts. Open this file and change the following text<activity android:name=".RegisterViewActivity" android:exported="false" /> <activity android:name=".MainActivity" android:exported="true"> <intent-filter> <action android:name="android.intent.action.MAIN" /> <category android:name="android.intent.category.LAUNCHER" /> </intent-filter> </activity>to
<activity
        android:name=".RegisterViewActivity"
        android:exported="true">
        <intent-filter>
            <action android:name="android.intent.action.MAIN" />
            <category android:name="android.intent.category.LAUNCHER" />
        </intent-filter>
    </activity>
    <activity
        android:name=".MainActivity"
        android:exported="true">
    </activity>
Ensure your AVD is set up from the previous lab.
Select the
Runbutton in Android Studio.Select your AVD and wait for the application to launch.
Verify that the registration screen appears as designed.
Once you have tested your application, change back the code to the
previous version in app/src/main/AndroidManifest.xml file.
This ensures the login screen is first shown when the user launches the
application on the phone. This is important for future labs.
You have now successfully created the UI for a registration screen
using LinearLayout. This foundational skill will be crucial
as you continue to develop more complex UIs in your Android
applications.
Solution
If you are really stuck, you can copy the file before into
register_view.xml file to get the same screen as the
lab.
java/com/Solution.java
<?xml version="1.0" encoding="utf-8"?>
<ScrollView xmlns:android="http://schemas.android.com/apk/res/android"
    android:id="@+id/scrollview"
    android:layout_width="match_parent"
    android:layout_height="match_parent">

    <LinearLayout
        android:layout_width="match_parent"
        android:layout_height="wrap_content"
        android:orientation="vertical">

        <TextView
            android:id="@+id/app_title"
            android:layout_width="match_parent"
            android:layout_height="wrap_content"
            android:layout_margin="24dp"
            android:gravity="center"
            android:text="Register"
            android:textSize="24sp" />

        <EditText
            android:id="@+id/email"
            android:layout_width="match_parent"
            android:layout_height="wrap_content"
            android:layout_margin="16dp"
            android:ems="10"
            android:hint="Email"
            android:inputType="textEmailAddress"
            android:minHeight="48dp" />

        <EditText
            android:id="@+id/password"
            android:layout_width="match_parent"
            android:layout_height="wrap_content"
            android:layout_margin="16dp"
            android:ems="10"
            android:hint="password"
            android:inputType="textPassword"
            android:minHeight="48dp" />

        <EditText
            android:id="@+id/full_name"
            android:layout_width="match_parent"
            android:layout_height="wrap_content"
            android:layout_margin="16dp"
            android:ems="10"
            android:hint="Full Name"
            android:inputType="text"
            android:minHeight="48dp" />

        <EditText
            android:id="@+id/phone_number"
            android:layout_width="match_parent"
            android:layout_height="wrap_content"
            android:layout_margin="16dp"
            android:ems="10"
            android:hint="Phone Number"
            android:inputType="phone"
            android:minHeight="48dp" />

        <TextView
            android:id="@+id/textView3"
            android:layout_width="match_parent"
            android:layout_height="wrap_content"
            android:layout_margin="16dp"
            android:text="Gender" />

        <RadioGroup
            android:id="@+id/gender_group"
            android:layout_width="match_parent"
            android:layout_height="match_parent"
            android:layout_margin="16dp">

            <RadioButton
                android:id="@+id/male"
                android:layout_width="match_parent"
                android:layout_height="wrap_content"
                android:text="Male" />

            <RadioButton
                android:id="@+id/female"
                android:layout_width="match_parent"
                android:layout_height="wrap_content"
                android:text="Female" />

            <RadioButton
                android:id="@+id/other"
                android:layout_width="match_parent"
                android:layout_height="wrap_content"
                android:text="Other" />
        </RadioGroup>

        <CheckBox
            android:id="@+id/agree_checkbox"
            android:layout_width="match_parent"
            android:layout_height="wrap_content"
            android:layout_margin="16dp"
            android:text="Agree? Privacy Notice" />

        <Button
            android:id="@+id/register_button"
            android:layout_width="match_parent"
            android:layout_height="wrap_content"
            android:layout_margin="10dp"
            android:text="Register" />

        <TextView
            android:id="@+id/login_link"
            android:layout_width="match_parent"
            android:layout_height="wrap_content"
            android:layout_marginTop="8dp"
            android:text="Already have an account?"
            android:textColor="#0000FF"
            android:textSize="16sp" />
    </LinearLayout>
</ScrollView>
Author
UL